 |
| More tips and tricks for the Avid editing system. |
This is the eighth edition of the
Avid Editing Tips and Tricks series. This collection again includes some tips for features recently added to the
Avid Media Composer. As always, if you have any comments or suggestions, you can reach me through the comments of this blog, through
Google+,
LinkedIn or Twitter, using the
@mBlazeVideo handle.
Keep in mind that I work on an
Avid Media Composer on the Mac. If you are using Windows, the COMMAND key on the Mac does what the CTRL key does on Windows and the OPTION key on Mac is the same as the ALT key on Windows.
 |
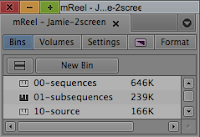
| Standardized bin names. |
- Standard Bin Naming Convention - A great way to keep your projects organized is to develop a standard naming convention for bins in all projects. For instance, I find it helpful to name all of my sequence bins "00-sequences". Doing so makes them always appear at the top of the list in my project window.
- Mapping Bins to the Keyboard - I tend to like to use my keyboard more often than the mouse, so I find it helpful to map as much as I can to the keyboard. Recently, I started using a technique to map a particular bin to the keyboard. Now I can select an active bin with a touch of a key. To start, I create a BIN LAYOUT (not sure if this is available in earlier versions of the Media Composer) with the bin I want to select as the active bin. I name the BIN LAYOUT the same name as the bin (it helps to have a standard naming convention of bins for all projects, as mentioned in the first tip). In the COMMAND PALETTE, select the WORKSPACES tab, assign the BIN LAYOUT to one of those WORKSPACES. Now you can assign that WORKSPACE to any key on the keyboard.
 |
| Setting a Bin Layout to a Workspace in the Command Palette. |
 |
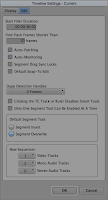
| Timeline settings. |
- Using Keyboard to Set a Default Mode for Pasting Clips - For editors who use copy and paste in their timeline, this trick sets the default for INSERT or OVERWRITE. Start by creating a new WORKSPACE, map that WORKSPACE to a key on the keyboard and link that WORKSPACE to a named TIMELINE setting (see Avid Tips and Tricks - Part I - Keyboard Setting that Changes Timeline). In the Edit tab of the TIMELINE settings, the DEFAULT SEGMENT TOOL should be set to whichever way you want your paste function to perform - INSERT or OVERWRITE. Now whenever you choose that key on the keyboard, any pasting of clips into the timeline will obey the setting of the DEFAULT SEGMENT TOOL.
- Re-arranging Timeline Tracks - We know that you can rename tracks in the Avid timeline (see Avid Tips and Tricks - Part III - Rename Track), but did you know the tracks can be re-arranged vertically? If you hold the OPTION key and move the cursor over the track identifier (V1, V2…), the cursor changes to a finger, you can then OPTION-CLICK and drag that track vertically to rearrange its placement in the timeline. Some editors like to place their timecode track between the audio and video tracks to give a better visual separation of audio and video. OPTION-CLICKING between the track identifiers, allows you to adjust the track height. For more options on changing track size, see Avid Editing Tips and Tricks - Part IV - Enlarge / Reduce Audio Waveforms.
- Avid Timeline Zooming - I'm guessing most Avid users know the different keyboard methods for zooming, but since I use them all the time, I figured it might be a good idea to review timeline zooming. COMMAND-M allows you to zoom in to just the part of the timeline you want, by giving you a lasso tool. COMMAND-/ zooms out to include the full timeline. COMMAND-[ zooms the timeline out incrementally. COMMAND-] incrementally zooms the timeline in.
I hope some of these tips and tricks have been useful. I'm always on the lookout for ideas to speed up my Avid editing workflow. Please feel free to contact me with any suggestions you may have for future
Avid Editing Tips and Tricks.


Warning! Don't change the top/down order of the video tracks. If you create v1 and then create v2 on top of it, so that clips on v2 cover clips in v1, changing the order will NOT cause v1 clips to be on top of the v2 clips. The order of the tracks does not change when you move the tracks
ReplyDeleteGood point, reordering video tracks will cause confusion for composites. I never change the order of video tracks. I have used the technique to place the TC track between audio and video to make switching modes easier, and I can see the value of moving audio tracks around when managing a sequence with many audio tracks.
DeleteI've just released a free Mac-only utility for Media Composer editors to auto-name their VFX locators and to create a Sub Caption file from those locators to make video burn-ins. You can download it here:
ReplyDeletehttp://www.chrisconlee.com/Loc2VFX.htm