 |
| The top ten Avid Editing Tips and Tricks. |
Another top ten list from the DV Fanatics blog. This week our list is the top ten
Avid Tips and Tricks from the last few years. This list was determined in a very non-scientific way. It's in the order of the tips that received the most positive comments.
Some of these tips are available only in later versions of the
Avid Media Composer, but a lot of the tips have been around since the very beginning.
Quick Transitions (
from Avid Editing Tips and Tricks - Part I)
Is there a certain transition effect that you use over and over again and you're sick of adding a dissolve and changing the parameters to how you want it? Well you know effect templates can be saved by dragging them to a bin, but did you know that if that bin is named "Quick Transitions", those effects will be a choice in the pull-down menu of the Quick Transition dialog? This will work even if the "Quick Transitions" bin isn't currently open, as long as it has been open in the PROJECT in the past.
Batch-rendering Sequences (
from Avid Editing Tips and Tricks - Part V)
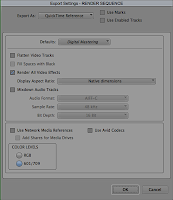 |
| Batch rendering sequences. |
A lot of times I have projects that require me to have multiple sequences that I'm working on simultaneously. I find it very time-consuming to load each sequence into the EDIT MONITOR and render them individually. I recently started using a much quicker technique. I've created an Export Setting called "RENDER SEQUENCE". This is a QuickTime Reference movie setting with nothing selected but "Render All Video Effects". Now when I want to render all of my sequences, I select them all in a Bin, choose Export and make sure this setting is selected. This trick will save a tiny Quicktime movie export to a folder that I then need to clean out from time to time.
Export Names Longer than 27 Characters (
from Avid Editing Tips and Tricks - Part VI)
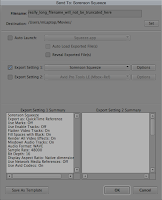 |
| Exporting long filenames. |
From reading posts in various Avid forums, it's safe to say that many editors are frustrated with the way Avid truncates any filenames over 27 characters when exporting. This limitation is a carry-over from when different operating systems couldn't handle filenames longer than that. This trick is a technique to maintain long export filenames. When in the EXPORT dialog, you can change the name of a file to something with more than 27 characters, but if you have multiple sequences, you can only change the name of the first sequence in the cue. Instead of using the EXPORT command, use the "Send To... > Encoding > Sorenson Squeeze" command. This can be set up to use any EXPORT setting and maintains long filenames. The added advantage to using the Send To function is that you can send your sequence or clip to two separate EXPORT settings simultaneously.
Creating a Sequence of Stills with Dissolves (
from Avid Editing Tips and Tricks - Part V)
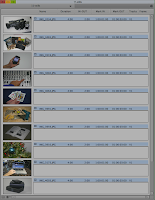 |
| An Avid bin in Script View. |
Import your images at a duration that includes material for the dissolves and the duration the image will remain on screen (see
Avid Tips and Tricks - Part IV for information on how to set your frame import duration). Once the images are imported, put your bin in SCRIPT VIEW. With the bin in SCRIPT VIEW select all of the clips in the bin and use the Step Forward 10 Frames key on your keyboard (usually the 2 key) to advance the clip so there is enough material for a transition effect. Use the Mark IN key on the keyboard (usually the I key) to set an in point on all the clips. Use the Step Forward 10 Frames key again to advance the clip the amount you want it to remain on screen and hit the Mark OUT key on the keyboard (usually the O key). Arrange the clips by dragging them up and down in the bin however you want them to appear in the sequence. The top clip in the bin is the first clip in the sequence. Drag the clips to your empty TIMELINE to create a sequence. Add an in point on the first clip, an out point on the last clip and select Quick Transition. Add a dissolve of however many frames you need (Ending at Cut), click the "Apply To All Transitions (IN -> OUT)" and then click "Add". You have now created a sequence of stills with dissolves on every transition in much fewer steps than it would have been for you to mark in and out points on all of your clips.
Video on the Back of a 2D Page Peel (
from Avid Editing Tips and Tricks - Part II)
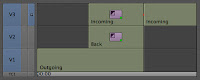 |
| Video on the back of a page peel. |
If you want a texture on the back of a 2D page peel effect to sell the look of a page turn, this is a tip will show you how. If you have the outgoing and incoming video on V1 in a sequence, drag the outgoing video to V3. Trim the video on V3 back the number of frames you want your transition to last. Go back to the transition point and insert an "Add Edit" on V3. Add a Peel in the flavor you prefer to the segment on V3 that overlaps the outgoing video. Add a keyframe to the first frame of the effect and set the Level to 0. Add a keyframe to the last frame of the effect and set the Level to 100. Add the video you want to be on the back of the Page Peel onto V2, make sure it is the same length as the segment with the Peel effect on V3. If you enter the EFFECT MODE with the effect segment on V3 selected, you can drag the effect icon from the effect editor directly to the segment on V2. This will use the same effect parameters as are used on V3. Since this is a real-time effect, no rendering is required.
Building Default Settings for all New Users (
from Avid Editing Tips and Tricks - Part III)
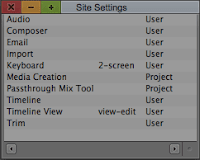 |
| Site Settings used for default settings. |
Tired of rebuilding all of your settings each time you create a new user on your Avid editing system? Use the SITE SETTINGS to make each of your preferred settings the default settings on the system. Under the Special menu, choose SITE SETTINGS and drag all of the settings that you would like, into the Site Settings window. Now whenever you create a new user on that system, it will use the settings you have saved. This is useful even if you're the only user on the system - I have multiple User Profiles for myself depending upon how I will be editing. For example, I have a profile for a single screen and a profile for a two screen setup. As a freelancer, I generally carry my SITE SETTINGS with me so that I can grab individual settings. Be careful never to overwrite existing SITE SETTINGS at facilities you may be working at. No one wants your settings as their default.
Mapping Bins to the Keyboard (
from Avid Editing Tips and Tricks - Part VIII)
I tend to like to use my keyboard more often than the mouse, so I find it helpful to map as much as I can to the keyboard. This particular tip is similar to a tip in
Avid Tips and Tricks - Part I, that allows you to map TIMELINE VIEWS to WORKSPACES using the "Link to Named settings" property. Recently, I started using this technique to map a particular bin to the keyboard. Now I can make a bin active with a touch of a key. To start, I create a BIN LAYOUT (not sure if this is available in earlier versions of the Media Composer) with the bin I want to select as the active bin. I name the BIN LAYOUT the same name as the bin (it helps to have a standard naming convention of bins for all projects, in my case the bin is named "10-source"). In the COMMAND PALETTE, select the WORKSPACES tab, assign the BIN LAYOUT to one of the WORKSPACES. Now you can assign that WORKSPACE to any key on the keyboard.
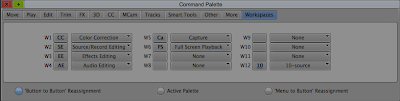 |
| Assigning the "10-source" bin to a key for instant access. |
Saving Title Without Source (
from Avid Editing Tips and Tricks - Part VII)
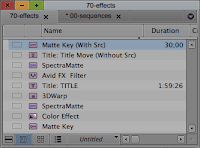 |
| Saving effects to a bin. |
Want to re-use a title move or other effect properties on another title? If you OPTION-DRAG a title from the EFFECT EDITOR to a bin, you save the only the effect parameters of a title without the source. This means it will not save the title text information, just the properties added to that title in the EFFECT EDITOR. The opposite works on effects applied to segments. If you OPTION-DRAG the effect that is applied to a segment, from the EFFECT EDITOR to a bin, you can save the effect with source.
Inserting Lower Tracks into a Timeline (
from Avid Editing Tips and Tricks - Part I)
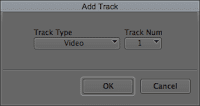 |
| Inserting a video track. |
This is a trick for inserting a new video track underneath an existing composite in the TIMELINE. Holding down the OPTION key while choosing Add Track, allows you to insert a new track anyplace in the order of existing tracks. If you happen to already have clips on the track you choose, it will move those clips to the next track above the inserted track. This works with audio tracks as well.
Editing Titles From the Bin (
from Avid Editing Tips and Tricks - Part IV)
A quick way to edit titles, or to use an existing title as a template, is to edit it directly from the bin. This is done by pressing the OPTION key and double-clicking the title in the bin. The title will open in the Title Tool, ready for editing.
Those are the top ten
Avid Editing Tips and Tricks from the first eight blogs in the
Avid Editing Tips and Tricks series. I'll keep the series going as I think of new tips and tricks to add. As usual, if you can think of any I have missed, let me know.


No comments:
Post a Comment