 |
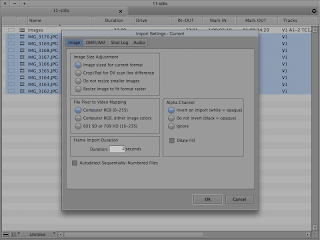
| Avid Import Settings for setting duration of the import. |
Since the
Avid Editing Tips and Trick series continues to be very popular on the
DV Fanatics Blog. This week is the fourth edition in the series. Feel free to drop me a line if you have any questions or comments regarding these tips. You can reach me via comments on this blog, through
Google+ or through
LinkedIn.
Here are this weeks
tips and tricks. Some are relatively simple, while some are a little more involved. I am using
Avid Media Composer on the Mac, so if you are using a Windows system, remember that COMMAND on the Mac is the same as CTRL on Windows and OPTION on the Mac does what ALT does on Windows.
- Creating a Sequence of Stills with Dissolves - Have you ever tried to import a bunch of still images, drop them into a sequence and then wanted to add a dissolve to every transition? You soon find out that you can't add a dissolve because there isn't any adjacent material to use in the dissolve. Here's the solution. Begin by setting your "Import Settings" to the duration that you want each still to remain on screen. In my example, I have the "Frame Import Duration" set to 2 seconds - the length of time each image will remain on screen. After you've selected a duration, import all of your images, select them in the bin and drag them into a new sequence.
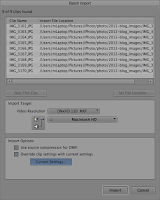 |
| Batch Import dialog in Avid. |
To give each of these clips in your sequence the appropriate handles for a dissolve, select all of them in the bin and choose "Batch Import..." under the "Clip" menu. A dialog box will appear and ask which clips you want to import, click the "All clips" button. In the next dialog box, under the "Import Options" section, click the "Override clip settings with current settings" box and then click the "Current Settings..." button. Change the "Frame Import Duration" to include media for a dissolve. I want a 15 frame dissolve, so I add a second to duration, changing the duration to 3 seconds.
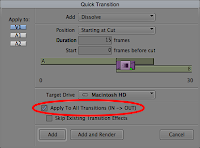 |
| Apply To All Transitions. |
Now after you've batch imported your images, the clips in your sequence will have media for a dissolve. Add an in point on the first clip, an out point on the last clip and select Quick Transition. Add a dissolve of however many frames you need (Starting at Cut), click the "Apply To All Transitions (IN -> OUT)" and then click "Add". You have now created a sequence of stills with dissolves on every transition in much fewer steps than it would have been for you to mark in and out points on all of your clips.
 |
| Solo V3. |
-
Solo a Video Track - If you have a composite in the timeline and want to solo a specific video track, you can do so by holding down the COMMAND key and clicking on the video monitor indicator of the track. The track monitor indicator box will turn green to let you know it is soloed.
- Editing Titles From the Bin - A quick way to edit titles, or to use an existing title as a template, is to edit it directly from the bin. This is done by pressing the OPTION key and double-clicking the title in the bin. The title will open in the Title Tool, ready for editing.
- Replace Timeline Views - If you hold down the OPTION key as you click on the Timeline View menu, the menu appears with the option to replace any of the existing Timeline Views.
- Enlarge / Reduce Audio Waveforms - When working with audio in the timeline, it's very helpful to view the audio waveforms. In order to get the appropriate detail, it's sometimes necessary to increase the track size by pressing the COMMAND-L keys or reduce the track size with COMMAND-K. Or if you're more of a mouse driver, OPTION clicking between the tracks changes the mouse pointer allowing you to change the track size with the mouse. Did you know that it's possible to change the waveform size within those tracks? Clicking COMMAND-OPTION-L enlarges the waveforms and COMMAND-OPTION-K reduces the size of the waveforms in the track.
As I edit on the
Avid Media Composer, I often remember other tips and tricks. As I do, I will write them down and include them in future editions to the
Avid Tips and Tricks series.


With regards to your first trick, may I suggest another method to create the stills dissolve sequence. First create a text bin view that has the headings IN, OUT, and IN to OUT Duration.
ReplyDeleteThen, rather than import for just the duration you need, import all your stills for a few seconds longer than you really need, I typically do a 30 second import. Once you have all the clips into a bin, change to the SCRIPT BIN tab, this will give you thumbnails of each still along with the same information that your last TEXT view gave you. Select all your clips (Ctrl-A or Cmd-A) Then using the 2 and 4 buttons move into your clip enough frames to cover your anticipated dissolves. Mark an IN on all the clips (I key), move forward the duration you want each still to last (minus 1 frame) and mark an OUT (O key). You should then confirm the IN to OUT duration noted on each still. Then ALT or OPT drag all the clips to your timeline. This will create the sequence of your stills in the order you have them.
BTW, in the script view, you can order the stills by dragging them up and down the bin as needed. You can also modify the durations of each individually or as a group by selectively highlighting the clips you want to change marks on.
As you suggest, on your sequence mark an IN in the first clip and an OUT in the last clip, then apply the dissolves you want IN to OUT.
This may seem like a bit more work, but it gives you clips longer than you need, and saves you having to wait for the second import to happen.
Scott Cole
Senior Post Production Editor
60 MINUTES, CBS News
Thanks Scott, that's a great alternative.
DeleteI had heard that trick at one time, but I when I tried it, I had tried it in text view which doesn't work. The trick is switching it to Script View.
Could you explain what exactly means: "Then using the 2 and 4 buttons move into your clip enough frames to cover your anticipated dissolves." ?
ReplyDeleteThe 2 button is the 2 on the keyboard, it generally advances the video 10 frames. The 4 key on the keyboard generally advances the video 1 frame. It all depends on how you have your keyboard set up.
Delete