 |
| Tips and tricks for newer Avid Media Composers. |
This week's collection of
Avid Editing Tips and Tricks is the seventh part of the series. This week's collection includes some tips for features recently added to the
Avid Media Composer. As always, if you have any comments or suggestions, you can reach me through the comments of this blog, through
Google+,
LinkedIn or Twitter using the
@mBlazeVideo handle.
As always, keep in mind that I work on an
Avid Media Composer on the Mac. If you are using Windows, keep in mind that the COMMAND key on the Mac does what the CTRL key does on Windows and the OPTION key on Mac is the same as the ALT key on Windows.
 |
| Selecting multiple keyframes. |
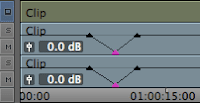
- Audio Keyframes - In the new Avid Media Composer, there are a number of new capabilities added to audio keyframes (audio rubber banding). One new capability is the ability to copy and paste keyframes. Now ranges of audio keyframes can be copied and then pasted to another point in the timeline. This range can be selected by lassoing (dragging the mouse to select) the keyframes or SHIFT selecting multiple keyframes. As always, keyframes can be moved up and down by selecting and dragging them, keyframes can be moved in time by selecting them and OPTION-DRAGGING the keyframes left or right.
- Drag and Drop Clips into Bin - The Avid Media Composer now allows importing media without going through the import menu. If a movie file is dragged and dropped into bin, the file will import into the system, creating Avid media files. On the other hand, if you OPTION-DRAG a movie file to the bin, the system creates an AMA linked clip.
 |
| A title without source. |
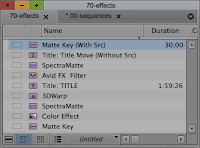
- Saving Title Without Source - Want to reuse a title move on another title? If you OPTION-DRAG a title to a bin, you save the effect parameters of a title without the source. The opposite works on effects applied to segments, if you OPTION-DRAG the effect from a segment to a bin, you save the effect with source.
- Redundant trimming - If you have to trim a number of transitions the same amount of frames, all you have to do is type in the number of frames the first time you trim. Each time after that, all you have to do is enter the trim mode and hit the ENTER key.
- Deleting a Match-Frame Edit - If you have a match-frame edit on a segment, such as an Add-Edit that you no longer need, it can be removed by entering the trim mode on that edit and hitting the DELETE key.
The great thing about the
Avid Media Composer is that there are various ways to do the same thing, leaving it up to the editor to choose the method that works best for the workflow. Please feel free to contact me with any suggestions you may have for future
Avid Editing Tips and Tricks.


nice info from u
ReplyDelete