 |
| Creating a file with alpha from a flat image file. |
Last week we discussed "
Common Image Files for Video", and which files are best for what types of graphics. This week we'll look at a solution for another challenge - needing to key a logo over video when the graphic does not contain an alpha channel.
A lot of times when producing a video I will ask the client for their logo and I'll get back a graphic file with the logo matted over a background color. If I want to use this graphic, it's always best if it has an alpha channel before I bring it into an editing application.
 |
| The logo from which I will be extracting an alpha channel. |
This technique uses
Adobe Photoshop and gives the graphic a
unmatted alpha channel, which means that the parts of the graphic which are opaque don't have any of the background colors blended along the edge of the alpha channel. Doing a simple chroma key in an editing application, will leave a slight edging of of the background color on the viewable graphic. In the case of the graphic I'm using, no black edging around the white and orange.
Keep in mind that I work on a Mac, if you are using Windows, the COMMAND key on the Mac does what the CTRL key does on Windows and the OPTION key on Mac is the same as the ALT key on Windows.
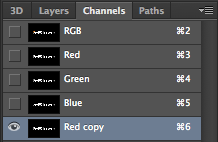 |
| The Channels tab in Photoshop. |
After you have opened the graphic in Photoshop, click on the Channels tab. The file should be in the RGB Color Mode, so the Channels tab should have 4 layers: RGB, Red, Green and Blue.
Since the logo I am working with in this example is made up of 2 colors, white and orange, I will make a copy of the Red channel. The goal is to make all of the opaque parts of the image white. If necessary, use Levels… under the
Image > Adjustments menu to bake sure the opaque parts are 100% white and the transparent parts are 100% black.
Use this finished channel to
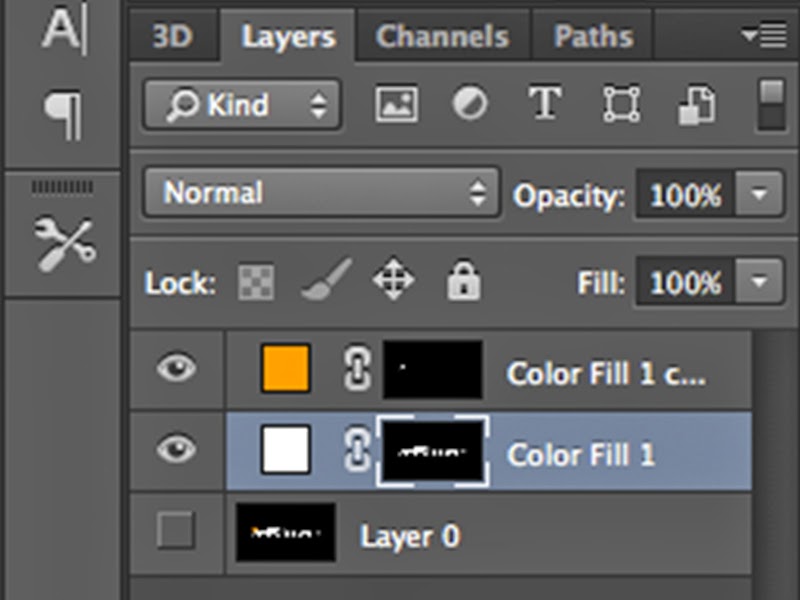
Load Selection (COMMAND-CLICK on the channel), select the RGB (COMMAND-2) channel and go back to the Layers tab. It's now time to create a solid layer for each color used. When you create a solid with a selection, the solid will fill that selection by way of a mask. On my example, I use white for the first color, then I duplicate that solid and place it below the original graphic and monitor only the layer that has the original graphic. This allows me to sample the orange color in my logo.
 |
| Removing the orange spark. |
I now have two new layers in my Photoshop file. A version of my logo that is all white and a version that is all orange. My next step is to edit the mask of each layer so it only allows the part of the graphic I want to color white or orange. If I OPTION-CLICK on the mask of the layer, it opens up and I can edit it. For the white layer, I lasso the spark above the "m" and delete it. While in this mask edit mode, if I click on the mask of the orange layer, that layer opens and I can edit its mask. For the orange layer, I select "mBlaze" and delete that. To get back to viewing the file, OPTION-CLICK on the mask layer you were just working on, in my case the orange layer.
 |
| The final logo with an alpha channel. |
The last step is to remove the layer that contained the original graphic and make sure the remaining layers are viewable. You can either output the file as PNG with transparency, or just save the new
Photoshop file. Most editing applications will open Photoshop files and display transparency the same way as Photoshop.
You now have a clean logo with an alpha channel. When you key this over your video, there will be no halo effect around the edges.


No comments:
Post a Comment