 |
| More Avid tips and tricks for your editing toolkit. |
This is the tenth
Avid Editing Tips and Tricks blog from the series. This collection includes a couple that I recently learned from the Avid community. As always, if you have any comments or suggestions, you can reach me through the comments of this blog, through
Google+ LinkedIn or Twitter, using the
@mBlazeVideo handle.
Again, keep in mind that I work on an
Avid Media Composer on the Mac. If you are using Windows, the COMMAND key on the Mac does what the CTRL key does on Windows and the OPTION key on Mac is the same as the ALT key on Windows.
-
 |
| The pass-through track in a chroma key effect. |
Using a Transition Effect on a Chroma Key - If you've ever tried to use a transition effect on two chroma key effects, you know it can be problematic. I'm not a fan of placing identical transition effects on both the foreground and the background, so here's a tip to achieve the transition with only one transit effect.
The trick is understanding how Avid deals with composite effects. If you step into simple key, there are always two tracks: the foreground and background. Usually the background track in a nest is empty, it looks down to the track below the effect track in the timeline to get the background.
 |
| The background of the chroma key nested into the effect. |
Much like our discussion in Adding Effects to a Chroma Key Foreground in Avid, that empty layer can hold your background layer, making the chromakey composite a single layer. This causes the Avid to treat the composite as one clip. Now any transition effects can be placed on it and the results will be as expected. One thing to note: if you decide to delete the chroma key effect, your background track will be deleted along with the effect.
-
 |
| Deinterlace. |
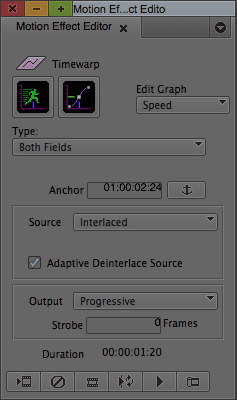
Deinterlacing Footage - I was recently doing some compositing work in Avid FX with older footage that was shot interlaced. Unfortunately I couldn't find a way to deinterlace the footage in Avid FX so I turned to the Timewarp effect in Avid to do the trick. (I'd love to know if there's a way to do it in Avid FX, but I couldn't find it.)
I was surprised how good the results were. All you have to do is apply the effect, go into the MOTION EFFECT EDITOR set the source to interlaced and the output to progressive. For me the results weren't good without the ADAPTIVE DEINTERLACE SOURCE selection checked. Keep in mind, checking the ADAPTIVE DEINTERLACE SOURCE option changes a realtime effect to non-realtime.
I still have issues with the MOTION EFFECT EDITOR as I've mentioned in the blog Motion Effects in the Avid Editing System, but the deinterlacing works great.
-
 |
| Changing keyframes to fixed. |
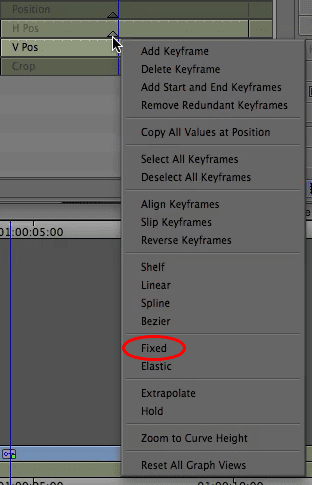
Fixed Keyframes - In my blog Avid Editing Tips and Tricks - Part V, I mentioned how I prefer to use dissolves on titles and alpha graphics, rather than the FADE EFFECT button. I still prefer that method, but here is a way to change your keyframes from ELASTIC to FIXED.
The reason you would want FIXED keyframes rather than ELASTIC keyframes is to make sure FADES you have created stay the duration you have set them to, even after you change the duration of the segment they belong to. For example, if you have a 10 frame FADE at the end of a 2 second title, and you decide to trim out that title to 4 seconds, your fade will now be 20 frames.
If you right-click on keyframe in the ADVANCED KEYFRAMES window of the EFFECT EDITOR, and in the drop-down menu, click FIXED in the bottom half of the menu.
I hope some of these tips and tricks have been useful. I'm always on the lookout for ideas to speed up my Avid editing workflow. Please feel free to contact me with any suggestions you may have for future
Avid Editing Tips and Tricks.


No comments:
Post a Comment